Title: Localizing a Sencha Touch application
Summary: In this article we will see how to localize our Sencha Touch based application. There are two aspects to this. One, we will see how to localize the Sencha Touch framework related messages, formats, etc. Second, we will see how to localize our application specific messages and formats.
Problem Statement: Sencha Touch, as compared to ExtJS framework, does not come with out-of-the-box support for different locales. However, in an application, localization is considered as one of the important requirements. In this article, we would talk about the things that we will have to do to localize our application in different languages.
For simplicity, we will exclude the localization of the data as it is usually the offering of the data source and has nothing to do with Sencha Touch.
Prerequisites: Working knowledge of JavaScript, HTML, CSS, and Sencha Touch.
System Requirements: Sencha Touch framework. You may download the framework from here.
How to do it:
- Create project folder: Extract the Sencha Touch framework to a folder of your choice, say, c:\touchworkspace (will refer this as ${TOUCH_WORKSPACE}). We will refer the extracted location as ${TOUCH_FRAMEWORK}. Create a project folder, say – localization, inside ${TOUCH_WORKSPACE}
- Create locale folder inside the project folder where we will be creating our locale specific files to localize Sencha Touch framework.
- Create touch-in_HI.js inside the locale folder to start localizing the framework for Hindi language, which is the first language in India
- Sencha Touch offers components(list, form, index bar, etc.) and various classes (Validations, Model, etc.), which have got properties that must be localized to build a truly international application. In our approach, we will use the property overriding to localize the Sencha Touch framework. And for this purpose, we will use
Ext.applymethod given by the framework. To localize the complete framework, we will have to go through the complete source code to get the list of properties that need to be overridden. However, for demonstration purpose, we will see how to localize the default label of the OK button, which is offered byExt.MessageBoxclass. First, let us find the property that we need to override. After looking at the code, we found that it is thetextproperty on theExt.MessageBoxOK button that we will have to override to translate it into Hindi. So, we will add the following code to touch-in_HI.js file:Ext.apply(Ext.MessageBox.OK, {text : 'ठीक है'});This will ensure that the label is now translated into Hindi, if touch-in_HI.js file is used in the application.
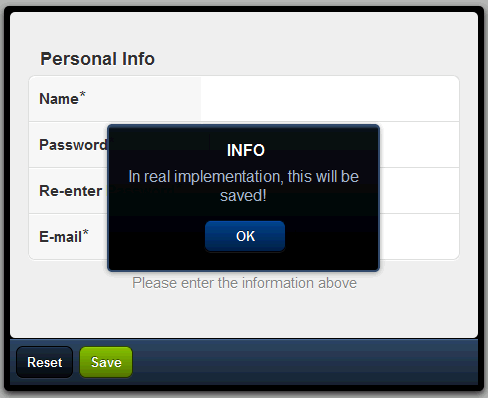
- The previous step will take care of localizing the framework. However, in an application, we will also have application specific labels, messages, formats, etc. And it is this aspect, as well, that we need to take care of. E.g. the following image shows how our application looks in the default language, which is english:

In the above form, we have various field labels, button text and messages. As a guideline for building an enterprise application, I assume that we have already externalized all these literals to a separate file, say app-en_US.js, as shown below:
Messages = {
WELCOME: 'Hello World',
PERSONAL_INFO: 'Personal Information',
NAME: 'Name',
PASSWORD: 'Password',
RE_PASSWORD: 'Re-enter Password',
EMAIL: 'E-mail',
PERSONAL_INST: 'Please enter the information above',
RESET: 'Reset',
SAVE: 'Save',
SAVE_MSG: 'In real implementation, this will be saved!',
INFO: 'Info'
};
And, we have used these constant literals in our application, as shown below:
Ext.setup({
    onReady: function() {

        var form;

        var formBase = {
            scroll: 'vertical',
            items: [{
                    xtype: 'fieldset',
                    title: Messages.PERSONAL_INFO,
                    instructions: Messages.PERSONAL_INST,
                    defaults: {
                        required: true,
                        labelAlign: 'left',
                        labelWidth: '40%'
                    },
                    items: [
                    {
                        xtype: 'textfield',
                        name : 'name',
                        label: Messages.NAME,
                        useClearIcon: true,
                        autoCapitalize : false
                    }, {
                        xtype: 'passwordfield',
                        name : 'password',
                        label: Messages.PASSWORD,
                        useClearIcon: false
                    }, {
                        xtype: 'passwordfield',
                        name : 'reenter',
                        label: Messages.RE_PASSWORD,
                        useClearIcon: true
                    }, {
                        xtype: 'emailfield',
                        name : 'email',
                        label: Messages.EMAIL,
                        placeHolder: 'you@sencha.com',
                        useClearIcon: true
                    }]
                }
            ],
            listeners : {
                submit : function(form, result){
                    console.log('success', Ext.toArray(arguments));
                },
                exception : function(form, result){
                    console.log('failure', Ext.toArray(arguments));
                }
            },

            dockedItems: [
                {
                    xtype: 'toolbar',
                    dock: 'bottom',
                    items: [
                        {
                            text: Messages.RESET,
                            handler: function() {
                                form.reset();
                            }
                        },
                        {
                            text: Messages.SAVE,
                            ui: 'confirm',
                            handler: function() {
                            	Ext.Msg.alert(Messages.INFO, Messages.SAVE_MSG);
                            }
                        }
                    ]
                }
            ]
        };

        if (Ext.is.Phone) {
            formBase.fullscreen = true;
        } else {
            Ext.apply(formBase, {
                autoRender: true,
                floating: true,
                modal: true,
                centered: true,
                hideOnMaskTap: false,
                height: 385,
                width: 480
            });
        }

        form = new Ext.form.FormPanel(formBase);
        form.show();
    }
});
You may save the above code in a file by name app.js.
You may have your own custom components or classes defined where the default texts/formats/etc. are defined as part of the class. In that case, you may use the Ext.apply mechanism to override the desired properties.
Now, to localize the application in Hindi, we will create a app-in_HI.js and add the translated text to it as shown below:
Messages = { WELCOME: 'हेलो विश्व!! यह स्थानीयकरण का एक नमूना उदाहरण है!', PERSONAL_INFO: 'व्यक्तिगत जानकारी', NAME: 'नाम', PASSWORD: 'पासवर्ड', RE_PASSWORD: 'पुनः दर्ज करें पासवर्ड', EMAIL: 'ईमेल', PERSONAL_INST: 'कृपया उपरोक्त जानकारी दर्ज करें', RESET: 'रीसेट करें', SAVE: 'संचय', SAVE_MSG: 'वास्तविक कार्यान्वयन में यह बच जाएगा!', INFO: 'जानकारी' }; - Now that we have created the various JS files with the localized information, it is the time to see them in action. Say, now we want our form to be displayed in Hindi. To accomplish this, we will create an index.html file and the following code to it:
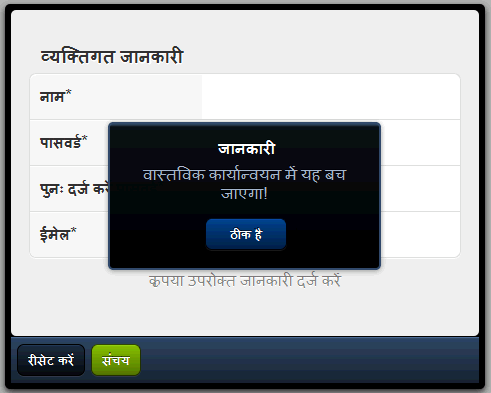
<html> <head> <title>Sencha Touch Localization</title> <link rel="stylesheet" href="../sencha-touch/resources/css/sencha-touch.css" type="text/css"> <script type="text/javascript" src="../sencha-touch/sencha-touch-debug.js"></script> <script type="text/javascript" src="touch-in_HI.js"></script> <script type="text/javascript" src="app-in_HI.js"></script> <script type="text/javascript" src="app.js"></script> </head> <body> </body> </html> - Now access the index.html in the browser, which supports HTML5 – say, Chrome. You shall see the labels and messages translated into Hindi, as shown below:

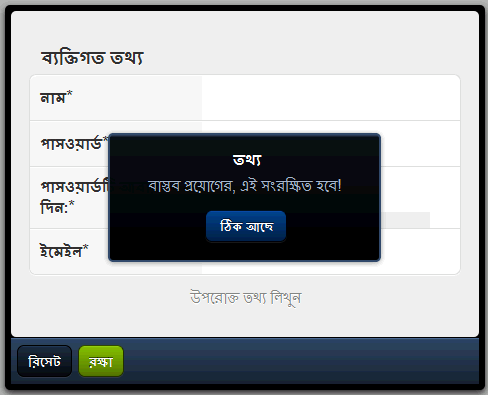
Similarly, you may translate the framework and you application to any language or your choice as I have done it for Bangla (language spoken in India and Bangladesh), as shown below:
Now, based on your deployment strategy, you will have to handle the inclusion of the locale specific files. Following are three different deployment strategies:
- English only: In this case, the application is deployed with support for English language, only. If this is the case, we don’t have to do anything for framework localization. We only have to ensure that application specific locale file is included, which is in English. Note that the default english language supported by the framework is US english.
- Non-english but single locale: In this strategy, the application is deployed with a single non-english locale support, e.g. Spanish. In this case, we will have to include the framework and application files, which contain the Spanish localization, in our index.html as we have shown in this article for Hindi.
- Multiple locales: In this strategy, the application is deployed with support for multiple locales and it shall switch to the appropriate locale based on certain property in the application, e.g. language code selected in user preference. In this case, our application shall derive which locale files need to be loaded based on the application property and load those files, dynamically. This is done by creating a
scripttag and append it to theheadelement on thedocument.
This shall pretty mush set us with the localization.


Good day Sir. how to pass a parameter in messages={……..}?
because I have to do like this;
the message is originally :
RECORD_ADDED_S: ‘ records have been added successfully.’,
and the output should be like
2 records have been added successfully or
3 records have been added successfully
Well, in this specific case, since you need to show the record count along with a text, you need to get the record count (may be, from a store or array length) and concatenate Message.RECORD_ADDED_S to produce the final text that need to be displayed.
Other option could be that you define the text as:
RECORD_ADDED_S: ‘{0} records have been added successfully.’
and when you have to produce the final text, you would call:
Ext.String.format(Message.RECORD_ADDED_S, 2); //this will return “2 records have been added successfully”
Ext.String.format(Message.RECORD_ADDED_S, 3); //this will return “3 records have been added successfully”
OR
Ext.String.format(Message.RECORD_ADDED_S, arr.length); //this will return “X records have been added successfully” where X is determined based on the array length
Hope this helps!
Hi,
How would you manage multiple language on a native sencha app ?
Since there’s no refreshing possibilities, how would you update the labels once the first locale file is loaded?
on a web app, you simply refresh and based on logic, you provide the right locale file. this does not work on a native build.
Any ideas ?
Hi,
If you are packaging Sencha Touch app using PhoneGap then try by using “location.reload” to refresh the app.
Hope this helps.
Thanks
Sencha tutorial contains a complete topic on the internationalization, which can be accessed on below URL: http://senchatutorials.in/#Internationalization:Creating%20Hindi%20Application*0
Hi, it is me again.
After more study, it seems that the only way is to override those component and do those initialization one by one.
Hoping there is other simple way from here.
Hey man! great article! i loved it! But i got one question:
How can i set various locale js and choose which one to use?
For example: i’m creatting a little app and i want to give support to brazilian portuguese, spanish and english (US and UK), i created the files (app-en_US, app-en, app-pt_BR) but if i load all in index.html, the last one is the one used. I looked your article and didn’t see a solution for this.
@Flavio
Do you have an application need to switch between the languages based on user selection or your application is expected to be deployed with one non-english language support?
I have an application and i want to switch between languages based on the device’s language.
Default: English.
If the device’s language is “PT-BR”, “ES”, switch to theses ones.
I got the same problem. I know I have to load the file dynamically. The point is how dynamically loading the selected language file and refresh the page with all state kept.
You will have to reinitialize the application. I prefer to do this using a route which resolves to a controller method and that method recreates the UI with the newly loaded language.
And, you would have to use your UI state information (if you have persisted it) to take the user to the screen where he/she was.
Thanks so much for quick responses.
That is what I thought. But I am stuck on “reinitialize the application”.
i have tried to removeall / destroy all the components, and then create the component again. However, the title/text of the component just don’t change at all.
I define the component like the following
items: [
{
xtype: ‘titlebar’,
title: Messages.WELCOME,
}, { … }
]
and “reinitialize” like this
changeLang: function(locale) {
me = this;
Ext.Ajax.request({
url: ‘./resources/localizing-‘ + locale + ‘.js’,
success: function (response, opts) {
eval(response.responseText);
console.log(“Language Change”,”Locale changed :” + Messages.WELCOME);
var content = this.getMainContent();
content.removeAll(true, true); // either one is NOT work
this.getWelcomePage().destroy();
content.add( Ext.create(‘MyApp.view.WelcomePage’), {
maxWidth: 1024,
width: ‘100%’
});
},
failure: function() {
//Ext.Msg.alert(“Failed to load Locale file”);
},
scope: this
});
}
The print out of the console.log shows the message.WELCOME has changed. but the component still using the old one, after create.
It finally work after I add this
listeners: [
{
fn: function(component, eOpts) {
component.setTitle(Messages.WELCOME);
},
event: ‘initialize’
},
on the titlebar item..
but it is not acceptable that if i need to add listener to all component.
it seems that some where cache the content of the component, and reused when create it. does any way to clear it.
Thanks again for your time. 🙂
Great Article.
I tried this, and it is working like a charm.
I never knew, localizing the Sencha Touch is that simple.
I have tried jQuery.i18n library for jquery mobile websites.
I am wondering, why don’t we create a similar localization plugin for Sencha too.
Thanks for the comment, Jacob! We would be coming up with a design pattern and a solution for this.
Stay tuned!
Hullo,
Loved the article. I did something similar for Traditional Chinese and English in my last project. I was planning on writing a post about it, but I think you covered a lot of ground already 🙂 Maybe I’ll just add my implementation for multiple languages and for the rest link to you 🙂
(oh and I’d love to network with you, since you’re in India and work on ST2, so, if you can see my email below, gimme a buzz on it, and I can add you to LinkedIn)
Anyway, Cheers !!
Sasha
Thanks for the comment!
My LinkedIn id is http://www.linkedin.com/in/ajitkumarazad
In which editor you typed the hindi font.. i am not able to create the app-HI.js which contain hindi fonts 😦
Well….on Mac, you can use TextEdit whereas on Windows, you can use Rich Text Editor
Dear Ajit could you please let me know is there any training schedule on EXTJS and Sencha touch from our side and what will be the fee for the same.
Please look at the “Upcoming Events” on our company website (http://walkingtree.in/) for the upcoming training schedule.
Sencha Touch 2 has got quite a good amount of changes and enhancements. A lot cleaner as compared to 1.1. I quickly modified the sample to run it with Sencha Touch 2 and here is the new code:
Ext.setup({onReady: function() {
var form;
var formBase = {
scroll: 'vertical',
items: [{
xtype: 'fieldset',
title: Messages.PERSONAL_INFO,
instructions: Messages.PERSONAL_INST,
defaults: {
required: true,
labelAlign: 'left',
labelWidth: '40%'
},
items: [
{
xtype: 'textfield',
name : 'name',
label: Messages.NAME,
useClearIcon: true,
autoCapitalize : false
}, {
xtype: 'passwordfield',
name : 'password',
label: Messages.PASSWORD,
useClearIcon: false
}, {
xtype: 'passwordfield',
name : 'reenter',
label: Messages.RE_PASSWORD,
useClearIcon: true
}, {
xtype: 'emailfield',
name : 'email',
label: Messages.EMAIL,
placeHolder: 'you@sencha.com',
useClearIcon: true
}]
},
{
xtype: 'toolbar',
docked: 'bottom',
items: [
{
text: Messages.RESET,
handler: function() {
form.reset();
}
},
{
text: Messages.SAVE,
ui: 'confirm',
handler: function() {
Ext.Msg.alert(Messages.INFO, Messages.SAVE_MSG);
}
}
]
}
],
listeners : {
submit : function(form, result){
console.log('success', Ext.toArray(arguments));
},
exception : function(form, result){
console.log('failure', Ext.toArray(arguments));
}
}
};
Ext.apply(formBase, {
fullscreen: true,
autoRender: true,
floating: true,
modal: true,
centered: true,
hideOnMaskTap: false,
height: 385,
width: 480
});
form = new Ext.form.FormPanel(formBase);
form.show();
}
});
Make sure that you include the sencha-touch-all.js OR sencha-touch-all-debug.js file in the .html file. Following are the noticeable changes:
1) the dockedItems property is gone in 2 and hence I had to make the toolbar as an item and the docked property on it will tell where the component shall be rendered
2) Set the fullscreen property on the form. Alternatively, you may use the Ext.Viewport class
After these changes, the applications works as earlier. Try this and I hope it would work for you!
I’d also like to know if you’re working with Sencha Touch 2. Do you? Thanks!
it doesn’t work with Sencha Touch 2, but with the guide, we’ve implemented multiple languages support in out app very easy.
Yes, we are working on Sencha Touch 2. If you have any specific question related to Sencha touch, please do post them on following forum:
http://www.walkingtree.in/forums/forumdisplay.php?16-Sencha-Touch
In case you are looking for consulting / training on Sencha Touch, please contact us by visiting following link:
http://walkingtree.in/index.php?option=com_contact&view=contact&id=1&Itemid=57
Are you running Sencha Touch 1 or Sencha Touch 2?
in Sencha Touch 2, if you include it will prompt error:
Uncaught TypeError: Cannot read property ‘OK’ of undefined
(anonymous function)
It is better for worldwide as well as our country as there are so many regional languages.
Thanks Again
Manoj